|
Steps:
 5. Fins: For the fins we used the illustrator file Annika created for a templet. We didn't realize that we had to take measurements so at the very end when it was time to put on the fins we had to calculate the weight of the fins and hope that they didn't weigh more or less then 58.87. We calculated this number by using the diameter and circumference of the rocket, then split our fins up into basic polygons and calculated 1/2 base time height. This is what our equations looked like.   6. Making our body: After measuring the fins we started the body process. This took us three attempts. To start building our body we first had to get a pvc pipe and cut out straight strips of paper. We then taped one strip t the pipe and placed it in a spiral motion downwards. After we came to the end of the strip we taped it to the bottom and started on the next strip. This layer had to be down a little differently. We placed wood glue all around the strip that was previously put on and placed it the opposite direction as the first strip, but we still used a downwards spiral. We should not have done this, because it caused our body to start bubbling. As we laid down the last strip we noticed that at some point they had overlapped and they no longer ended at the same place. This was very irritating, but we just let it dry, took it off the tube and tried again. The second tube we did we messed up one, because in the process of using the downward spiral we did not wrap it tight enough which caused our body to be very flimsy and wouldn't be able to have the support we needed to fly well. We finally asked Andrew for his help. He showed us how we should have put the glue on the paper instead of the tube. This would have prevented bubbles. He also showed us how we would have wrapped our strips better by using "the indian burn method" This method made our strips tight and hold together very well. This time we used four stips insead of 3. For the final step of making our body we added one last layer of water and glue after it had dried to make sure it held together well, took it off the pvc pipe and had a beautiful body. By this point I was really excited, because it finally felt like we were getting somewhere with our rocket and like it was going to fly well.   7. Making the nose cone: Making the nose cone was the longest and hardest part of the project. We used two pieces of balsa wood that had been glued together to make it. We put the balsa wood on the drill press and began to sand the block. While the block spun I held out a piece of sandpaper and shaped the block. This took a really long time to get it to become circular and the right diameter to fit inside of our scientific mission. Once it was circular we began to shape the bottom and make it round. This process became a little harder when we broke the stick that had been holding it in place. Because the stick was broken inside our nose cone we couldn't complete it using the drill bed and had to sand it by hand. We finally got the nose cone to the shape, size and design we wanted and this step was completed.    8. Putting the pieces together and painting: Putting all the pieces together was really fun! We glued on the fins using super glue, the scientific mission was held on by a pvc cap, which then held the nose cone. We added a straw for the launch lug and medal piece for the engine mount. After putting it all together we just needed to do two last test.  9. The tests: For the last part of building our rocket we had to test it to make sure it would fly straight. We did this by tying fishing wire to the rocket and spinning around. In order to see if it worked we had to put a motor in it. After this test we had to see if it flew straight while accelerating. Basically we just spun around in a circle really fast and pulled the rocket in closer. Our rocket flew straight, and now we just had to wait to launch it.   Launch Day!Launching our rocket: When we got to fiesta island it was really windy which of course would affect our rocket. We had a couple problems getting the fuze to light. Once we got it lit and it went up it got pretty far. It went completely straight and then back down. This was pretty exciting, because it met our body for our design was actually not that bad. We had an issue with the parachute. It didn't go off once the rocket was in the air causing it to crash to the ground breaking the fins. After getting our rocket back we discovered that the parachute had been to compressed into the rocket not allowing it to deflate. Even though our rocket had many issues and it didn't work out as well as I would have hoped I still really enjoyed the outcome of it. I was proud to say that I was able to get the chance to build a rocket from scratch and going into it knowing very little. My group and I worked very well together and we achieved something that I didn't think I could. This project was a learning opportunity for me not only in knowledge about rockets, but also in finding out what one is capable of when driven.  Looking beyond: I don't know if I will do anymore projects or experiment with rockets, but I really enjoyed the opportunity I had to be able to experiment with building my own rocket. Even though this wasn't the best project I believe we did this semester I think it is the one that I learned the most from. I salute anyone that is able to enjoy building rockets for fun, it isn't exactly my thing. Takeaways: I think the biggest thing I can take away from this project is being able to self motivate. I wasn't really into the whole rocket building thing, and at first it really showed. I didn't want to go the extra mile to make my rocket the best it could be, but once I started to ask questions and one to a better understanding as to what we were doing I became more excited. I think the thing that motivates me the most was just knowing I put the best work I could into the rocket and whatever came out didn't matter, because I knew I tried.
0 Comments
 Purpose: The purpose of this lab is to learn more about earth science and where rocks come from. We wanted to see how rocks formed using these certain metals and how it involves the inner earth. Why is this topic important to understand? Research / Background info we need to know. Silicates: Combination of silicon(si) and oxygen(o) 95% on the earth's crust, and 97% of earth's mantle is made of silicates.
Na2sio3: sodium silicate Cacl2 + Na2sio3 ---- 2Nacl +Ca Si03 (Calcium chloride + Sodium Silicate)
 Elements on the right side of the periodic table make the elements electromotive "is a measure of the tendency of an atom to attract a bonding pair of electrons."(www.chemguide.co.uk/atoms/.../electroneg.html) meaning the atoms will get electrons taken away from them. The further apart elements are away from each other the more reactive it is. Steps:
 Looking Back: chloride: When it was first put into the beaker it looked like white clumps. but when mixed it formed white stringy crystals. This happened pretty slowly. The sodium and chloride really want to react together, because sodium has one valence electron and chlorine has seven valence electrons and they want to make a shell of 8. The sodium and chlorine split and join together with each other and the silicate and calcium bond and we are left with sodium chloride and calcium silicate which causes it to form the white crystals. Cobalt Chloride: When this was put into the test tube it started out as a red circular objects, but as time progressed it went up towards the top of the beaker. It looked like blue/ Pink long strand. (kinda like coral) The sodium and the chloride mix together to form a shell of 8. The Cobalt bonds with the silicate and this turns the substances into a blue crystal like substance. Copper Sulfate: When this was put into the test tube they were little pieces of light blue, as time progressed it clumped together and some even floated to the top. The color remained blue the whole time. This reaction did not really change from its original form. The copper mixes with the silicate and the sodium mixes with the sulfate and this forms the light substance. Looking Beyond: I was curious to why all of the substances mixed the way they did and why the reaction turned out the way it did in a crystal like form. I think it would be really cool for a future experiment to make my own crystals and look at rocks under a microscope. Looking Inward: I liked how our experiment turned out, I think it looked really cool. I didn't contribute as much individually. I think that is the issue with doing group labs like this. No everybody participates as much as they should or would like. Looking Outward: We all worked as a class, I don't think I like doing these labs as much as I did before, because I feel like I don't get to be as involved as I would like. I also feel like I spend most my time trying to take all the notes I miss certain parts that can be important. Looking Forward: If I can do this again I would try to be more involved or do it individually, so I can take more away from this experience. Doing this as a group kinda takes away from having you own experience and it becomes the classes instead of just your own. In the future this can help me to try and take more from this lab scientifically and not just take notes, but actually know what i'm doing.  This research was done by Annika, Isabel, and Sammie Motors:
______________________________________________________________________________ Powders:
http://www.skylighter.com/fireworks/how-to-make/End-Burner-Rockets.asp http://www.jacobsrocketry.com/aer/propellant.htm http://what-when-how.com/rocket-motor/end-burners-rocket-motor-2/ Creating our rocket design: My group and I decided to design a End motor with black powder, because we originally wanted to do a core motor with black powder, but he said that that particular type of motor explodes much easier and is more likely not to work so we decided to change it to an end motor. These are our designs for our motor. Illustrated by Annika!!! Rocket Motor Images:  Looking Back: The end result of our motor turned out to work fairly well, but not as well as I would have liked. At the end of the project while we were graphing( the graph shown above ) it showed an interesting shaped. I noticed that in the middle of the burning process the thrust was really inconsistent which was expected due to the time decrease, but I thought the thrust would have decreased a lot faster than it did. The motor gave off quite a bit of smoke and even showed fire at the end. Looking Beyond: When we launched our rocket it did not go off the first time, we came to find out that this had to do with the nozzle not being deep enough. We also originally wanted to do an core burner with sugar, but we did some research and talked to some other people and found out that this type of motor was most likely to explode. This happens because the core burner builds pressure and if the nozzle isn't big enough the pressure can not escape and causes it to explode. Looking Inwards: I thought it was really cool how when we got our rocket to work it created a lot of smoke and you can see the fire coming out the bottom. The trust did not go as much as i thought it would have though. I think in the future my group is going to change to a motor that has higher thrust and is more consistent throughout the process. Looking Outward: I worked with Annika and Isabel, I liked working with this group, because they stayed focused and we got the work down when we were supposed to. We all worked well together. I think I could have participated a little more, but I had a hard time understanding what we were supposed to be going. I helped with the research and making the deadlines, but Annika did the design and Isabel created the graphs. Looking Forward: If I were to do this project again I would try to reach out to people who knew what they were doing really well so I could start to understand for myself what I am supposed to do and not rely on my group to explain to me and walk me through it even know it helped a lot. Takeaways: I should be more aware of good resources that can help me understand deeper about how everything fits together. Sometimes I feel like I don't know how to do it and don't take leadership over the project I don't get as good of an understanding. I can resolve this by reaching out to people and not just sitting back and doing what I am supposed Video Link https://drive.google.com/a/hightechhigh.org/folderview?id=0B64dDTcEVrmsa1NpVkdaR2hPMlU&usp=sharing&tid=0B28U7WgPlxBHUldvNmRCdGhuSTg Big T and Little t Average Trust (T) / Burn Time (t) 2.020380645 / 6.2 Link to spreadsheet: https://docs.google.com/spreadsheets/d/1JJX9vn57riIwUpnRX59UycqPlGIDrLUOeMv6P6u9e_I/edit#gid=0 End Motor: For the final stage of our project we would like to use Autrina, Elyse, and Isabell's motor. We decided on this motor, because they had a much higher thrust which potentially would make the rocket shoot much higher than ours. The time is also a lot faster meaning that it shoots up high really quickly. Fuel: Black powder Nozzle: 1/4 Full Core: 3/16 Peak Thrust: 2,968
Research Chemical reaction A change in matter where the atoms in one mole substance combine or separate to create new stuff.
Atomic Structure:   Experiment Steps:
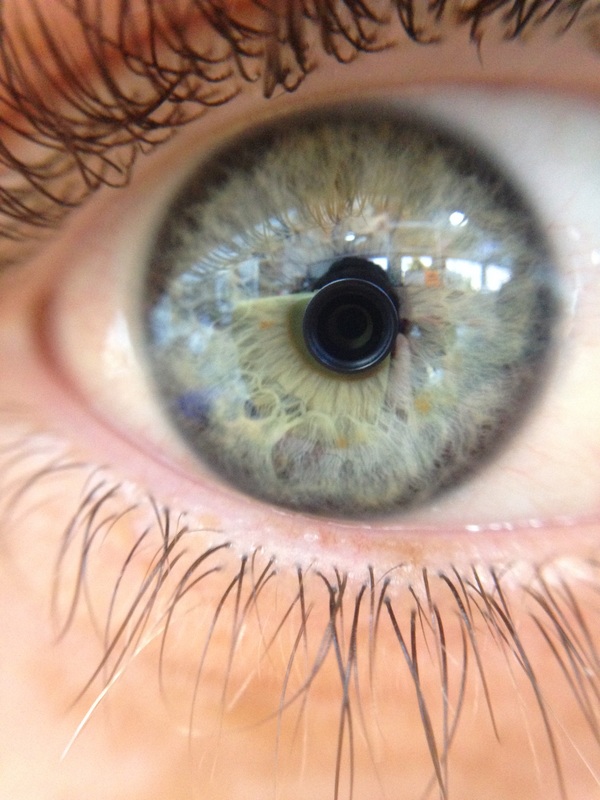
Looking back: The over all image of this experiment kinda looked like the dry ice project. We placed the balloon over the top of the beaker that was full hydrogen that look kinda like vapor. It filled the balloon and expanded. When it was full and tied the balloon floated in place. It pretty much hovered.  Looking beyond: When you mix the Magnesium and Citric Acid this causes electrons to trade places in order to make a full shell. The substance that was created from these to elements being mixed was hydrogen. When it turns to gas the molecules spread, because gases have an indefinite shape and volume. The molecules bounce all around in the balloon filling it. The balloon achieved neutral buoyancy meaning the density in the balloon was the same as the air in the room causing it to hover. Looking Inwards: None of us really new what to expect, because it wasn't a lab that we had done before or that I have seen, but the goal was to turn the mixture into HO2 and it worked so I think we got desirable results. My performance while in this activity was not very good due to having to leave in the middle of it and not being able to see the end results, but it did help to ask friends for videos and pictures so I could see the end results. Research also helped to better understand what I missed. In the future I would really like to stray away from planning ambassador tours on the same day of doing a project. Looking Outward: I worked with sabel and Mathew for this project. For what I did see we worked pretty well together. We divided up the work and talked about what was happening with our experiment. It was weird not working with Annika for the first time on a project, but we accomplished what we wanted and got the end result we desired. Looking Forward: I liked my group a lot and I would definitely work with them again. They all contributed equally and carried their own weight which was really nice. In the future I think I would like to do some more projects on turning things to gas. I think that is a really cool thing that I understand pretty well. I just need to find a project idea and maybe do it for next section or even this one. Takeaways: I really like taking notes for this experiment. It helped me a lot with going back and blogging. This helped me remembered questions I had and my thinking process.  Question: How can I learn more about helium even know I can't touch see or fill it. Measurements: Length: Meter(m) Volume: Liter (L) = 1dm to the 3rd power Mass: Gram(g) = 1cm squared = 1ml Time: Seconds(sec) Amount of stuff: Mole 6.02x10 to the 23rd power = mol Temperature:Kelvin c+273.15 = k Secondary Measurements: Ratio + Comparison Velocity= Density/time = d/t = m/s Molarity = moles/liter = mole/L Density = mass/volume = m/v = 9/cm 3rd power Buoyancy: The comparison between two substances. Sinks = negative Floats = positive Nutuals = some density Density of Bismuth: Pour water into 5ml and 78g of Bismuth to the water. You can see it rise to 8ml then put it into the equation. 78/8ml and the density equals 9.75 g/ml Helium Balloon: Air = .001225 g/ml Diameter = 22cm Radius = 11cm Sphere = 4/3 pi radius squared .35g/5575.28cm 3rd power = .00006277 g/cm 3rd power Or a more known number which is .062 Balloon + Tape = 6.48g Problem: The measurements were off due to how small they were and the equipment we used. The temperature in the room was also cold so the balloon was more compressed. Looking Forward: I liked the structure, because I could ask Andrew direct questions that he can answer and I also didn't get distracted. I think that this would have been good to start the year out with so that we new how to do the blog post and got a good feeling of how everything works. I think doing this at the beginning would have hired a lot of peoples grades. Looking Beyond: The research before allowed me to know what I am in fact doing, such as how to take measurements and learning and how it tied into the balloon. Asking questions was a good way to learn and understand. I was curious to why the temperature of the room affected the balloon, but I remembered that molecules in colder temperatures move slower. Looking Outwards: I contributed questions and took a lot of notes in which helped me blog. I really enjoyed the fact that I took notes, because it helped me to remember all the events that occurred while doing the experiment. It also helped me to remember how I was feeling about the project. I think taking notes is a strategy that I am going to take with me for the rest of the year in order to help me blog better. Take away / Remaining questions: Why, how does helium make your voice sound higher pitched? What is going on, on a scientific level. Answer: The less dense make your voice higher, because the helium atoms are lighter which allows sound to travel faster. In this video It talked about making a rainbow in a cup. The materials that are required are five cups, food coloring, sugar, spoon and some water. The fist thing you have to do is change the density using the sugar and adding different measurements of water to each cup. This changes the density, because you are adding sugar which has a density of 1.59 which is more dense than water and will cause it to sink, but by stirring it together changes the molecules mix and the density of the water changes. The more sugar you add to the water the more the sugar molecules are in space and the denser the water becomes. You will have to start with the most dense water and continue to add the next dense water carefully, because if you are not careful the sugar will mix evenly in the water and the rainbow will disappear. This happens, because once the water is all the same density they no longer float, but they are the same density so all the colors mix together. Here is the link to the video, enjoy:) 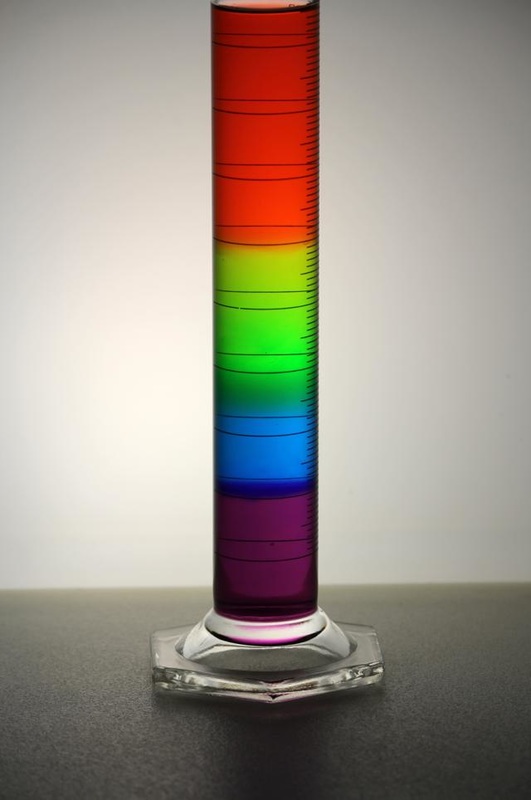 It will look something like this. For this lab I worked pretty much by myself, but Annika helped a lot. This was different from all my other experiments, because I was able to try things that were interesting to me and experiment more on the things I was curios about. I like working alone, but I also like having someone to help me and contribute ideas with, so in the future I think I will have a better balance in doing both. For this experiment Brayden showed us how to make fake snow using Sodium Polycracy. Sodium Polyacrylate is a Sodium polyacrylate is the absorbent material found in baby diapers, artificial decorative snow, and detergents. For the first part of this lab we tore apart a diaper in order to get the sodium out. It looked like little white balls. After we got it all out we put it in a beaker and poured 400ml of water in in it. This caused it to turn white and puffy, but it felt soft and like little grains of sand. After all the water was absorbed it filled the bowl with expanded sodium polyacry, but me and Annika wanted to see what happened if we put more water into it, so we put 800ml which caused it to expand more, but kept the white color. Then we added the 1200ml. The 1200 ml was really slushy and had no color it was almost completely see through. It expanded so big it filled a 8X8 cake pan almost to the top. We were very pleased with how our experiment turned out, because it allowed us to see how much water the substance can actually absorb and see for our self, but I think it would have been cool if we used more of the Sodium Polycracy to make the snow look more like snow and also not feel so wet and slimy. I find it pretty cool how atoms and molecules can just which places in this chemical in order to help it absorb more. I really enjoyed doing this lab, but I don't think it is anything I would be interested in research more about. For the time and space project I wanted to look more into the dilation of eyes. I was really curious to why the eye dilates in the dark. We started out with using the micro camera to record Griffins eye and took pictures of Isabell picture #1, Griffin picture #2 and mine #3. The micro camera allows you to zoom into the eye really closely and catches the pupil getting bigger. We learned that the main reason for an eye to dilate is to allow more light in to the eye. Here is the link to research we did. I really enjoyed the results to our experiment, because even though it was a little blurry you could still see the pupil clearly dilate. The main question that we were curious about was just why do pupils get bigger in the dark and we received the answer to this question by using this website http://wonderopolis.org/wonder/why-do-your-pupils-get-bigger-in-the-dark/ I worked with Annika for this project and as usual I strongly feel like we made a good team. We both contribute a lot of different talents to our project and it allows us to get desirable results.If I were to do this experiment again I would make the video more clear and maybe try to use different lighting to see how it affects the eye. I am also pretty curious to how the eye and the brain connect. How the eyes actually see and what part of the brain this uses. If i were to continue this project I would try to research more on that question. This is the link to our amazing video:) https://www.youtube.com/watch?v=963Ed2kIph8
|